Airflow Setup
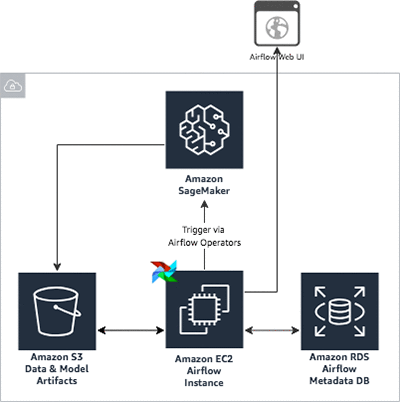
We will set up a simple Airflow architecture with a scheduler, worker, and web server running on a single instance. Typically, you will not use this setup for production workloads. We will use AWS CloudFormation to launch the AWS services required to create the components in this blog post. The following diagram shows the configuration of the architecture to be deployed.

The stack includes the following:
- An Amazon Elastic Compute Cloud (EC2) instance to set up the Airflow components.
- An Amazon Relational Database Service (RDS) Postgres instance to host the Airflow metadata database.
- An Amazon Simple Storage Service (S3) bucket to store the Amazon SageMaker model artifacts, outputs, and Airflow DAG with ML workflow. The template will prompt for the S3 bucket name.
- AWS Identity and Access Management (IAM) roles and Amazon EC2 security groups to allow Airflow components to interact with the metadata database, S3 bucket, and Amazon SageMaker. The prerequisite for running this CloudFormation script is to set up an Amazon EC2 Key Pair to log in to manage Airflow, for example, if you want to troubleshoot or add custom operators.
Airflow 1.10.12 Aurora Serverless
Airflow 2.0.2 Aurora Serverless
It might take up to 10 minutes for the CloudFormation stack to create the resources. After the resource creation is completed, you should be able to log in to Airflow web UI. The Airflow web server runs on port 8080 by default. To open the Airflow web UI, open any browser, and type in the URL here http://ec2-public-dns-name:8080. The public DNS name of the EC2 instance can be found on the Outputs tab of CloudFormation stack on the AWS CloudFormation console. (if you are an Amazon employee, disconnect the VPN to try the URL)
